


Canopy Glide Pruning for Smooth Growth and Safer Shade
Key Takeaways About Canopy Glide Pruning
Canopy glide pruning smooths branch transitions to reduce wind drag and improve light through the crown. This summary is for homeowners and property managers deciding when to act and which issues require professional help.
- Identify abrupt branch junctions and included bark that create stress points.
- Prevent large wounds by planning phased tapering cuts over seasons.
- Avoid over-thinning the crown to preserve inner foliage and root health.
- Spot increased sway cracks or frass after storms as warning signs.
- Reduce sail area by shortening heavy laterals and improving union angles.
- Plan inspections and photos to document change and guide follow up.
Introduction
Canopy glide pruning focuses on shaping branch transitions so leaves and limbs move smoothly in wind. Uneven growth creates drag that stresses trunks and anchors over time. Homeowners notice leaning limbs, bark tears, or heavy sway during storms. Addressing these issues improves tree health and reduces risk to nearby structures.
Properly smoothed canopy edges also change how light filters through the crown. Dense, abrupt branch clusters cast deep shade that impacts lawn and understory plants. Thinner, gradual transitions let dappled light reach lower layers without exposing crowns too much. That balance supports root health and reduces opportunistic decay.
Visible signs often include wind-thrown branches and crowded crotches where bark has begun to fail. A pro will inspect branch union angles, included bark, and weight distribution across the crown. They may use simple measurements and photos to document problematic transitions. Those observations guide targeted pruning rather than broad thinning that can harm the tree.
For properties near Fort Worth, TX and Mansfield, TX, storm season makes canopy drag more than an aesthetic concern. Left unattended, stressed limbs can damage roofs, fences, and power lines during gusts. Consulting a trained arborist reduces the chance of large structural failures. Scheduling an inspection is a reasonable next step when you spot repeated sway or bark splits.
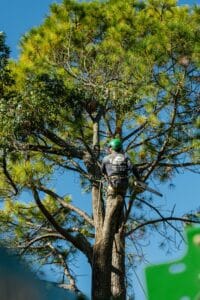
What Canopy Glide Pruning Means For Trees
Canopy glide pruning means reshaping branch junctions so limbs change angle smoothly, reducing wind drag and stress on the trunk. This technique focuses on modifying branch attachment points and tapering dense clusters without over-thinning the crown. Homeowners often ask whether pruning will hurt the tree, when done properly, targeted cuts preserve structural wood and encourage balanced growth. A clear homeowner question answered: proper canopy glide pruning reduces the chance of bark tears and storm-related branch failure.
- Remove crossing or rubbing branches.
- Shorten long, heavy lateral limbs slightly.
- Improve union angles where bark is included.
- Thin only where it eases abrupt transitions.
- Preserve live branch spacing and canopy density.
Technically, the method shifts weight and wind loads by adjusting branch length and taper rather than removing whole limbs. Inspectors look for abrupt diameter changes and dense clusters that act like sails in wind. Professionals may document problem areas with photos and simple measurements to plan precise cuts. This targeted approach avoids large open wounds that invite decay and pests.
Pruning for glide also aims to improve light penetration through gradual thinning along scaffold branches. Allowing dappled light supports inner canopy foliage and understory plants’ photosynthesis. In many yards, better light reduces moss and fungal growth by lowering shade and surface moisture. Homeowners should observe how light moves through the canopy at different times of day before making cuts.
Diagnosing whether a tree needs this pruning includes checking union angle, included bark, and limb sway during wind events. A simple diagnostic check is to watch the tree during a windy day or use a pole to gently move suspect limbs and watch for concentrated flex points. A professional may combine these observations with photos and a written report to recommend a plan. For related structural balancing methods, see canopy load tuning to compare approaches used by arborists.
How Canopy Glide Pruning Works And Why It Helps
Canopy glide pruning starts with mapping the crown to find abrupt angle changes and dense clusters that create drag. A pro will mark scaffold branches and measure diameters where a thin limb meets a thick leader to plan tapering cuts. They often use a handsaw, pole pruner, and measuring tape to stage smaller removals rather than making one large wound. This phased approach helps the tree compartmentalize wounds and maintain vascular flow for recovery.
Technicians adjust branch length and taper to redistribute wind loads across multiple attachment points, easing stress on weak unions. Diagnostic checks include gently flexing limbs and photographing union angles to compare before and after positions. Arborists may also inspect bark seams and callus development to ensure cuts will not expose long-running decay. Homeowners can see faster recovery when cuts follow the natural taper of the branch rather than blunt, perpendicular removals.
Another part of the method improves internal light by creating graduated openings along main scaffold branches, which encourages inner foliage to stay healthy. Better light reduces areas where moisture and fungal issues concentrate, improving overall crown resilience. For related airflow-focused pruning methods, review the material on canopy airflow boost to see how small changes in branch spacing influence wind movement through the crown. When done right, these minor openings let wind pass without turning limbs into sails.
Professionals confirm success by comparing sway patterns and performing follow-up inspections during wind events to watch for new stress points. They may note findings in a short report with photos and suggested timing for any corrective cuts. Homeowners should track seasonal changes and report recurring bark splits or abnormal lean to the inspector. If a diagnostic check reveals included bark or rapidly widening cracks, contact a trained arborist for a detailed plan and safer corrective pruning.
Common Causes Of Uneven Canopy Transitions
Uneven canopy transitions often begin with asymmetric growth where one side of the crown receives more light, causing longer laterals and abrupt junctions. Competing leaders can form when a main trunk splits and two dominant stems grow at similar size, creating stress points at the union. Heavy epicormic sprouting after injury concentrates weight near the bark, leading to sudden drag on scaffold branches during wind. Soil compaction near roots can reduce root anchorage and make the canopy’s uneven weight more dangerous in storms.
Incorrect previous pruning creates stubbed or flush cuts that alter natural taper and create abrupt diameter changes that collect wind. Past topping or excessive heading promotes dense regrowth at the cut sites, increasing sail area and localized drag on adjacent limbs. Insect or fungal injury can weaken specific branches so neighboring wood bears extra load and develops sharper transitions. Water stress episodes cause uneven cambial growth, making some branches thicker and stiffer than others.
Mechanical damage from mowers, string trimmers, or construction wounds changes branch attachment integrity and creates abnormal growth patterns near wounds. Snow, ice, or single-event limb loss shifts load to remaining branches, which then develop compensating, abrupt forms over seasons. Habitual limb rubbing where branches cross erodes bark and fosters included bark, a common cause of sudden failures at transition points. A professional inspection will check these areas visually and with simple tools like a tape measure and photos to record problematic diameters and angles.
Diagnosing the root cause often starts with observable symptoms such as uneven leaf distribution, concentrated sway, or cracked bark near unions during windy days. An arborist will measure branch diameters, note included bark, and test flex by gently loading suspect limbs with a pole for movement patterns. They may also recommend targeted work timed to the tree’s growth cycle to avoid heavy pruning in vulnerable seasons. For finer edge adjustments that reduce abrupt shading and improve transition flow, see canopy edge finesse, which complements canopy glide pruning approaches in places like Fort Worth, TX and Mansfield, TX.
Recognizing Warning Signs Of Canopy Drag Problems
Look for areas where branches pull away from the crown and reveal stretched bark that looks frayed or peeled. Noticeable changes in how a limb moves during wind, such as pendulum swings or delayed rebound, often indicate uneven load transfer. Bright wedge-shaped cracks at unions or seams in the bark deserve attention because they can signal failing attachments. If you smell rot or see sawdust-like frass near a junction, record photos and mark the spot for a follow-up inspection.
- Watch for sudden increases in limb sway.
- Check for widening cracks at branch unions.
- Note dieback or thinning foliage near transition zones.
- Look for new epicormic sprouts clustered on scaffold branches.
- Observe any fresh bark tears after windy weather.
Measure suspect branch diameters where thin laterals meet thick leaders to spot abrupt tapers that create drag. A professional would photograph these spots, compare diameters, and test flex using a pole to see where movement concentrates. Inspectors may use a moisture meter around wounds and take close-up images to document decay progression over time. For gradual smoothing solutions, homeowners can review options like crown gap smoothing to see how small adjustments change wind flow through the crown.
In yards near Fort Worth, TX storm gusts reveal weak transitions faster than calm conditions, so seasonal checks help catch problems early. For properties in Mansfield, TX, repetitive sway after storms suggests a need for targeted cuts rather than wholesale thinning. If inspection shows included bark, large cracks, or heavy asymmetric weight, contact a qualified arborist because these issues carry medium safety risk. Keep short, dated photos and notes to help the arborist diagnose and plan corrective canopy glide pruning steps.
Step By Step Homeowner Canopy Glide Pruning Techniques
Start by planning cuts from the ground using a measuring tape and pruning saw to mark target branches for gradual tapering. Inspect each junction closely and sketch a cut sequence on paper to avoid removing too much wood at once. For homeowners, a pole pruner and hand saw handle most reachable work while reducing the need for climbing. Always confirm stability of ladders and never cut above your reach without professional help when attachments look compromised.
Begin with small thinning cuts along scaffold branches to create smoother flow toward leaders, removing no more than 20 percent of live crown in one session. Make incremental shortening cuts back to a lateral that directs growth outward and maintains a natural taper. Use the three-cut approach for larger removals to prevent bark tearing and follow controlled steps when lowering limb sections. If a cut reveals decay or included bark, pause and document the spot with photos for a professional assessment.
Work around the crown symmetrically, alternating sides to rebalance weight rather than stripping one face entirely and causing sudden lean. Check results by gently flexing suspect limbs with a pole to see if sway concentrates at the same points. If movement improves, continue phased edits across two seasons to let the tree adjust vascular flow and callus formation. For more extensive structural changes consider professional methods described in structural canopy edits to plan safer, staged work.
After pruning, rake up and inspect cut wood for signs of decay or pests that may need follow-up treatment or monitoring. Record notes and photos dated to track healing and any new stress during wind events in Fort Worth, TX and Mansfield, TX. If unexpected cracking, large wounds, or increased sway appear after work, stop further pruning and consult an arborist immediately because safety risk rises. For any larger limb removals, review the three-cut method for safe limb removal before attempting the cut or hiring a professional.
When To Call A Professional For Canopy Glide Pruning
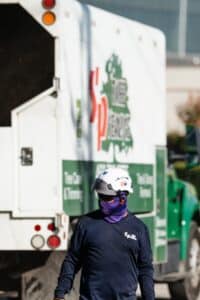
Call a professional when pruning tasks exceed safe reach, involve large scaffold limbs, or show structural defects you cannot reliably assess. A trained arborist will perform a hands-on inspection and may use a moisture meter and photos to document decay progression. They will also check union angles, included bark, and the distribution of weight across major branches during a live assessment. If you notice rapid enlargement of cracks after homeowner cuts, pause further work and seek expert evaluation immediately.
Professionals diagnose problems by observing symptoms, measuring diameters, and testing limb flex to locate concentrated movement points. They commonly use a pole for controlled loading, take comparative photos, and create a short written report with recommended actions. Based on findings, an arborist will recommend staged cuts, bracing, or selective removal tailored to the species and condition of the tree. This diagnostic process helps avoid over-pruning that can increase risk instead of reducing it.
Consider hiring a pro when the homeowner plan requires climbing, rigging, or significant limb lowering near structures or utility lines. These operations carry medium safety risk and need trained crews with proper equipment and safety protocols. For complex redirecting of growth, an arborist may also use targeted growth-direction trimming to influence future branch angles and improve transition flow. Documented follow-up inspections help confirm the canopy adapts as intended and reduce the chance of recurring drag problems.
If storms repeatedly reveal stress points despite homeowner pruning, schedule a professional evaluation to reassess the canopy plan and timing. In yards near Fort Worth, TX and for properties in Mansfield, TX, this extra assessment can prevent damage to buildings and fences during high winds. A pro will propose a maintenance schedule and note when to perform phased glide pruning to let the tree adjust between cuts. Request a written scope and timeline so you can compare options and plan work safely without pressure.
Preventive Care To Maintain Smooth Canopy Growth
Establish a seasonal check routine to spot new abrupt junctions before they worsen during high winds. Schedule inspections in early spring and late fall to catch growth changes and pest signs. Keep dated photos and short notes to track healing and any recurring weak spots over time. When uncertainty arises about a union, pause further cuts and get a professional evaluation for safety reasons.
- Inspect scaffold unions for included bark annually.
- Record photos after storms for future comparison.
- Limit live crown removal to phased sessions.
- Mulch correctly to protect root flare and soil moisture.
Maintain soil health by adding organic mulch and avoiding compaction near the root zone to support balanced growth. Proper irrigation during dry spells reduces abrupt cambial growth that leads to uneven branch thickness. Monitor for signs of decay with a moisture meter or visual checks after cuts to catch hidden problems early. If you detect rot or large cracks, contact an arborist rather than attempting aggressive cuts yourself.
Plan small, staged corrective cuts across multiple seasons to let the tree adapt vascular flow and form callus tissue. Use gentle shortening and selective thinning to guide future branch angles without creating big wounds. A professional can pair these edits with occasional structural inspections to confirm improvements in sway and load distribution.
Balancing Light And Safety With Pruning Plans
Start by defining clear goals for both light and safety, mapping where improved daylight would benefit lawns and where limb failures could harm structures. A pruning plan should phase cuts over seasons so the tree forms callus tissue and avoids shock from sudden canopy loss. Include specific tolerances for crown reduction and acceptable live crown removal percentages to guide field decisions during each session. Discuss expectations with any crew so cuts prioritize safety near roofs and play areas without opening the crown too abruptly.
Next, set measurable inspection checkpoints to confirm pruning meets those goals, such as reduced dense shading under primary limbs and fewer concentrated sway points. Use simple tools like a measuring tape, photos, and flex checks with a pole to record progress over time and document changes. A professional will compare those records and recommend next steps if new stress appears after a pruning phase. These checkpoints help prevent over-pruning while ensuring light improves where desired.
Coordinate pruning techniques with timing to protect seasonal growth patterns and reduce pest or pathogen entry when wounds form, especially after major cuts. For finishing touches on lateral growth and to smooth exposed tips, consider techniques like limb tip polishing to refine edges without removing large scaffolds. Communicate timing windows with an arborist so work aligns with the tree’s least vulnerable periods and with homeowner schedules. Proper timing reduces recovery time and keeps the canopy’s protective shade intact where needed.
Finally, balance risk by mapping target zones where safety overrides light gains, labeling high-priority limbs near power lines or structures for conservative tapering or removal. A plan should include a reassessment date and a contact for emergency inspections after storms, particularly in Fort Worth, TX and Mansfield, TX where seasonal gusts can reveal hidden weaknesses.
Frequently Asked Questions
What is canopy glide pruning and when is it needed?
Canopy glide pruning smooths branch intersections and tapering to reduce wind drag and improve light penetration through the crown. Arborists remove conflicting limbs, thin dense areas, and create gradual canopy transitions that lower storm stress. You may need this pruning when branches rub, shade patterns change, or limbs create sail-like surfaces during high winds. Pruning at height carries risk, if major cuts or climbing are required, hire a professional arborist for safety and proper technique.
How does canopy glide pruning reduce wind drag?
Canopy glide pruning reduces wind drag by removing crossing and protruding branches that catch gusts and cause turbulence around the crown. It creates smoother branch angles and gradual canopy transitions so wind flows through rather than against foliage. A professional inspects branch unions, target points, and sail-area reduction to confirm improved airflow using visual checks and photos. If pruning requires climbing or large removals, use a credentialed arborist for safety and to avoid property damage.
What visible signs show a tree needs glide pruning?
Look for uneven branch density where wind catches one side and causes visible swaying or broken smaller limbs. Crowded branch junctions and rubbing limbs create wounds and slow light penetration into the inner canopy. A sudden increase in leaf thinning or moss growth on shaded limbs often signals poor airflow and drag. Caution: if large limbs are unstable or near structures, contact a professional for Canopy glide pruning to avoid injury.
Can homeowners perform canopy glide pruning safely?
Homeowners can perform simple canopy glide pruning on low, accessible branches with correct tools and steady footing. Observe branch codominance, included bark, and crossing limbs before cutting to reduce drag and improve light. If work involves climbing, large limbs, or crown reduction, exercise caution and hire a professional. A certified arborist can inspect, diagnose attachment strength, and complete complex canopy glide pruning safely.
How do professionals diagnose transition problems before pruning?
A professional begins with a visual survey of canopy lines, looking for abrupt branch angles, rubbing limbs, and uneven light gaps. They use binoculars and sometimes a ladder to inspect collar health, decay, and included bark near transitions. Simple tests include flex checks and tap-sounding to detect hollow members, and a moisture meter or resistograph when decay is suspected. If climbs or power-line work are required, they caution homeowners and recommend hiring a qualified arborist for safe Canopy glide pruning assessment.